IMPORTANT: Annonce de Fermeture de Z51.biz

Chers clients et partenaires,
Après plus de quinze années d’engagement et de passion partagées, nous avons le regret de vous annoncer que Z51.biz cessera ses activités à compter du 15/02/2025.

Depuis notre lancement en 2009, nous avons eu le plaisir de vous fournir un accès fiable et sécurisé aux newsgroups, contribuant ainsi à enrichir vos échanges et vos connaissances. Cependant, avec l’évolution rapide des technologies et une baisse d’intérêt générale pour les newsgroups, nous avons pris la décision difficile de mettre un terme à cette aventure.

Nous tenons à exprimer notre profonde gratitude pour votre confiance et votre fidélité tout au long de ces années. Votre soutien a été essentiel à notre succès et nous en sommes sincèrement reconnaissants.

Si vous avez des questions ou besoin d’assistance durant cette période de transition, n’hésitez pas à nous contacter à l’adresse suivante : support@z51.biz.

Nous vous souhaitons le meilleur pour vos projets futurs et espérons que nos chemins pourront se recroiser dans d’autres contextes.

Merci encore pour votre confiance et votre soutien.

Cordialement,
L’équipe de Z51.biz

Tutorials

Alt.Binz setup
Start by downloading Alt.Binz

First step : Install

* Double clic on the exec. file you just downloaded in order to install Alt.Binz
* A window will open, clic on « Next »
* Select « Install »
* Once the install is over, clic on « finish »


Second step : Setup * On the main screen, on the upper bar, clic on << setup>> and then, at the left on << Servers >>


config-10

* In the sub-menu << Servers Properties >> complete the fild << Name >> with : << z51 >> and the address field with the address that you can find in the My Account page, do the same for the number of slots allowed.
* Clic the field << Server requires authentication >> and enter your username and password.

config-11

*** Attention ! Avant de quittez la fenêtre de configuration, cliquez sur << Add as primary >> ***
* Pour finir cliquez sur "OK" -> Alt.Binz est configuré :)
Grabit setup
Start by downloading GrabIt

First step : Install

* Double clic on the exec. file you just downloaded in order to install Grabit
* A window will open, clic on « Next »
* Select « I accept the agreements »
* Then clic on « Next»
* In the next window, again clic on « next » until you get this screen
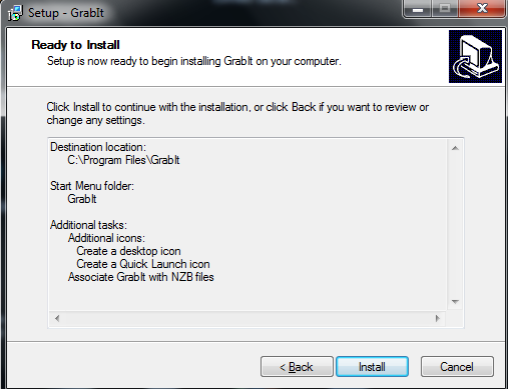

Install-2

* Here clic on « Install »
* Once the install is over, clic on « finish »


Second step : Setup

* The setup wizard will open, on the first screen, type the name of your server. ( if you don't know it, please consult our FAQ), then clic « next »
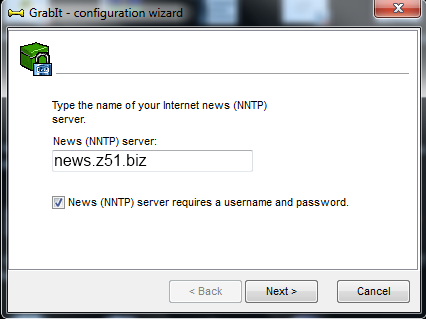

config-0.1

* On this new screen, in username, type your login in the first field, and your password ine the second, then clic on « next »
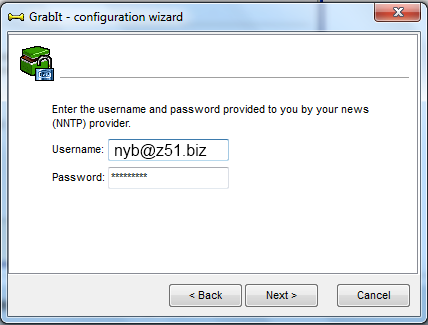

config-1

* Finally clic on « finish »
In order to define the utilized port and the number of connections, in Grabit main screen, right clic on "Default server" and clic on "server properties"
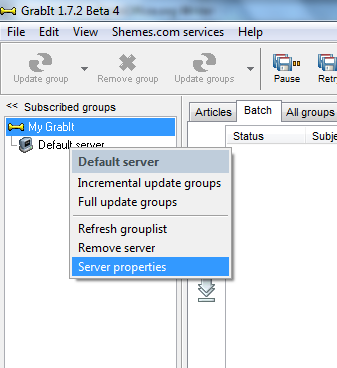

config-0

In the following screen, configure the port (check FAQ) in the appropriate field
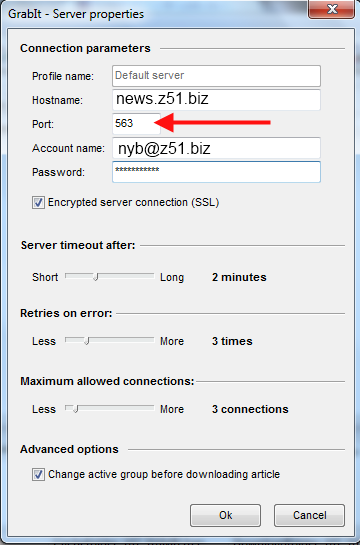

config-3

In the same window, define the number of slots you paid for.
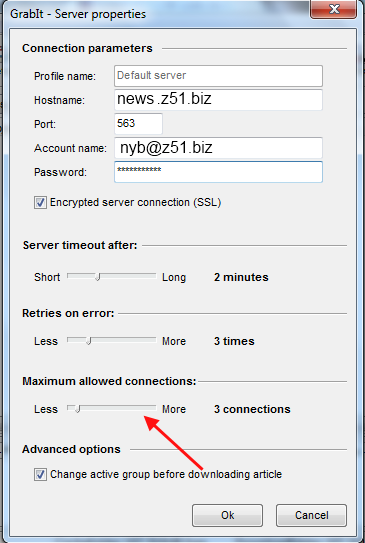

config-6

To finish the install, clic on "OK" -> GrabIt is installed :)
Download on newsgroups
To download on newsgroups you have to use a NZB search engine:
For example:
http://www.binnews.in/

(a list is available on the newsgroups tools page )

In the research field , type the name of the wished file, and select in the drop-down menu the section where launch the search (TV shows, Movies), to launch the search, clic the " BinnewZ " button.


Binnews


In the results, select and copy the name of the file to be downloaded.


 Binnews2

Then on http://www.binsearch.info/ type the name of the file wished (or stick the name of the file found on binnews).


Binsearch

In the result page , tick the case in front of the file you want to download, then clic on "GET NZB".


Binsearch-2

Open the file, and your download will start automatically in your client (Grabit, alt.binz....).
I did my first download, what do i do with the downloaded ".rar" files?
When you download files on newsgroups, it is separated in several parts to facilitate its download and sending on newsgroups.
These files are RAR archives (but not necessarily rare).

To run them, you have to get correct software, in this case, winrar.

Download this software and install it.

Once this software is installed, all the archives you have already downloaded, will be recognized at once by Winrar.

To unrar these archives, make a right-clic on one of the archives and select " extract to..."


 winrar-1


A new file, having the same name as the archives of departure, you will find the created files inside.
How do i fix/repair my (.rar, r01, 001, 002,...) files?
After downloading a file, sometimes some are corrupted or some part(s) are missing.

In order to be able to use those files, you have to fix them with Quickpar.

Download it here Quickpar and install it

After the software is installed, double-clic on the “.par2” file


quickpar

The software automaticaly fies the file(s) mean while clic on « monitor” and “auto repair”.

quickpar-4

Once QUICKPAR is done, you will get a message like : « repair not needed » or « file fixed ».

quickpar-3

Enjoy, your file is ready to go !! :D


In case Quickpar fails to fix your files, it might mean that it is too damaged or that is misses too many files to repair it.
Try to re-download the file or find another source.
2008/2025 © Z51